Clipping areas
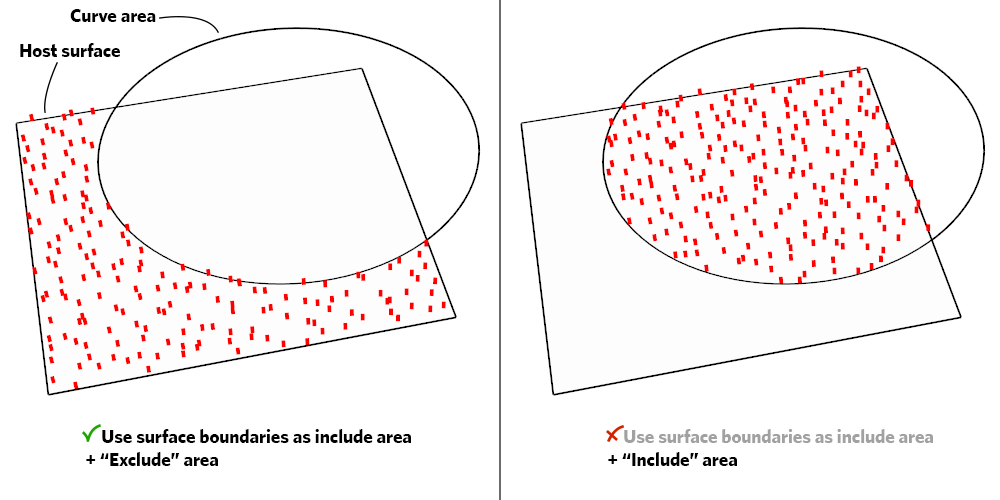
Areas can be "Include" or "Exclude". After scattering items on the surface, Skatter checks if each one of them is inside the boundaries of an area. If the area is "Include", the item is kept, if the area is "Exclude", the item is discarded.
To set the "Include"/"Exclude" property of an area, click on it in the list to highlight it. Additional properties will appear below the list.
IMPORTANT : When using Curve or Paint Areas as "Include", you probably want to untick the "Use surface boundaries as include area"checkbox, otherwise items will still be scattered all over the surface.

Curve Areas
A Curve Area is a group or component containing one or multiple edges.
Click on ![]() to start picking Curve Areas.
to start picking Curve Areas.
Like Curves as Hosts, it is best to use welded SketchUp curves, like the ones created using the Arcs, Circle and Freehand tools. You can use extensions like Weld to weld edges together into curves. If the edges are not welded as curves, Skatter will try its best to keep the continuity between edges, but you may still get unexpected results. Likewise, if the curve is not closed, Skatter will try to close it for you.
Paint Areas
Paint Areas are not made of geometry. They let you paint a boundary that will be treated like a Curve Area, but with the versatility of a paint brush.
Click on ![]() create a new Paint Area and start painting.
create a new Paint Area and start painting.
To paint or erase from the Paint Area, click it in the list to highlight it. A "Paint" and "Erase" buttons will appear. You can paint straight lines by clicking at the starting point, then clicking at the end point while holding SHIFT down. Use ALT to invert the painting brush behavior (ALT+paint will erase, and vice-versa).
The "Brush radius" parameter lets you change the radius of the circle brush.
You can copy/paste Paint Areas between setups by clicking the icons ![]() and
and ![]()
Object Areas
An Object Area is a group or component containing one or multiple faces.
It can only be an "Exclude" area.
The Object's geometry is projected onto the surface, if it intersects scattered items, they are discarded.
Update Areas
If you modify the geometry of a Curve or Object Area after picking it, you will need to update. Simply click on ![]() and Skatter will recalculate the scattering based on the updated geometry.
and Skatter will recalculate the scattering based on the updated geometry.
Surface Boundaries
When the "Use surface boundaries as include area" checkbox is ticked, the boundaries of the Surface will be treated as an "Include" Area (including for Falloffs and Boundary Check).
It is ticked by default. When using Curve or Paint Areas as "Include", it is recommended to untick this checkbox, otherwise items will still be scattered all over the surface.
Density Falloff

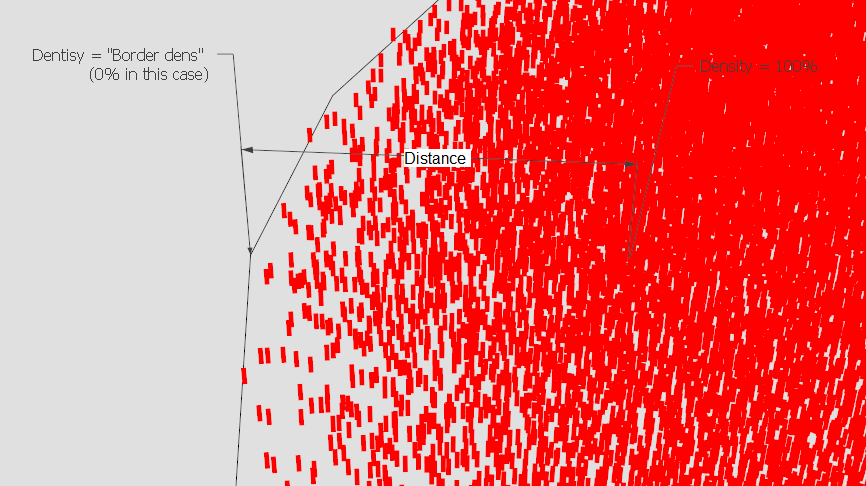
The Density Falloff lets you define a distance which controls the density as we move closer to the area boundaries.
The "Border density" parameter controls the density at the boundary. The default value is 0, which means scattered items will be completely discarded at the boundaries. But this is a percentage that can take any value.
The "Invert Falloff" checkbox inverts the falloff. Which means the density at the boundaries will be 100%, and the density at the "Distance" from the boundaries will be set by "Border density".
Scale Falloff
The Scale Falloff works exactly like the Density Falloff but controls the scale of the scattered items.
Both Scale Falloff and Density Falloff can be used together.
Boundary Check
To check if an item is scattered within the boundaries of an area, you have three options: Insertion point, Size and Distance.
Insertion point is the default, the simplest and fastest to compute. If the insertion point of an item is outside the area, the item is discarded. Scattered items will most likely overlap with the area's boundaries.
Size takes into account the size of the scattered item. The algorithm takes the longer size of the object and draws a circle around it. If the circle overlaps with the area's boundaries (or is completely outside), the item is discarded. The percentage field is a size multiplier, if you want to make the collision circle bigger or smaller.
Distance is similar to Insertion point, but the algorithm offsets the area boundaries by the "Distance" when computing if the insertion point falls into it.
Last updated